
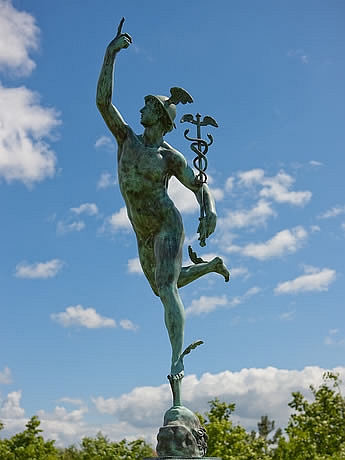
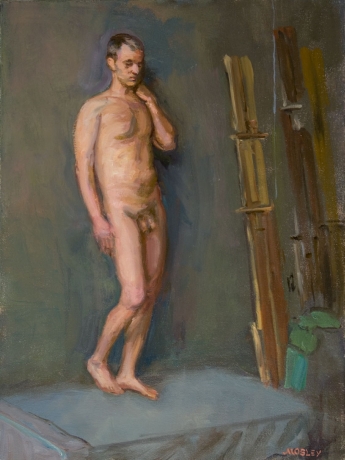
When considering pose types, the tendency might be to think of them as standing, seated, kneeling, reclining et al. However, those are variations on a theme. E.g., standing can be anything from the classic portrayal of Mercury/Hermes...
... to the relaxed pose in this painting.
The pose types are broad categories that encompass variations within them. The six categories come from this page. The site is also an excellent resource for new and potential models.
Type 1: Stretched poses
Stretched poses can be dynamic, exotic and highly artistic. They are primarily for warmups/gestures or short durations. They can be easily held for thirty seconds to a couple of minutes. However, they often involve unnatural or stressful body positions. They rapidly become uncomfortable or painful when held for three or more minutes, and for ten minutes or longer they are pretty much impossible to maintain.
Here's a typical stretched/gesture pose sequence from a life session.
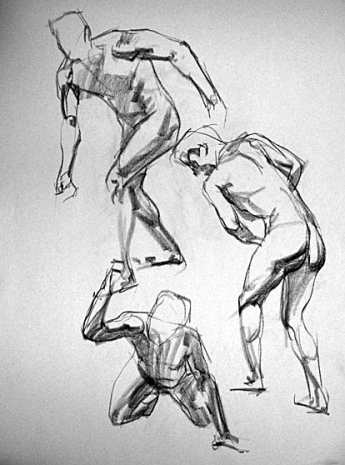
Unless you're an android or Superman, don't plan on using them when the serious work starts.
Type 2: Moving poses
In this pose, the model is in slow but constant motion. It is useful for studying how the human body moves from position to position, and challenges the artists to capture the motion and fluidity rather than how the model looks at a specific position. It's unlikely to be found in the average Life drawing session, but know what it is if the teacher or moderator asks for it.
Type 3: Idealized poses
These are the classical poses found in Greek sculpture and other ancient art. The Discus Thrower and the Dying Gaul — see the references in the next section — are two examples.
Type 4: Character poses
These poses are intended to be moody or emotional, and to evoke specific feelings in the viewer. This is a classic portrayal of despair.

Due to the starkness of the light and shadow, there is little visual information in the shot. However, it powerfully conveys the emotion. The catch is that it's a carefully staged photo pose. In a despair pose for a drawing group or class, the typical classroom or studio lighting can't be relied upon to convey or enhance the desired emotion, so a bit of acting skill is needed. If done well, it will be an enjoyable and productive session, the kind that leads to repeat bookings.
Type 5: Sports or fashion poses
These categories are based on the images one sees in the sports or glamor magazines. We older folks should probably avoid the latter category, inasmuch as our salad days of being total hotties are past.  On the other hand, we can do poses that the young'uns can't carry off successfully.
Sports poses offer a wide range of possibilities, especially in gestures and short poses. The imaginative model can adapt them for the 10-minutes-plus poses, but the stretch factor comes into play. Try the Discobolus for twenty minutes.
Type 6: Natural poses
These are covered in more depth later. They will be the staple for poses of ten minutes or more, just because they are fairly easy to hold.
This segment focuses on many aspects of poses separate from the six basic types listed above.
• The Web is a great resource for pose suggestions, from the classical ones such as The Thinker, the Discobolus (Discus Thrower), the Dying Gaul or the Vitruvian Man to thousands of contemporary ones. Surfing through the Figure forum at WetCanvas will provide a veritable album of poses that were actually used during life drawing classes.
For those who are really serious, there is a five-book series called "Art Models 1-5" (available through Amazon, which also lists books 6 and 7). They include hundreds of photographs and come with companion CDs with the poses in high-resolution photos viewed from many directions. There are also websites with tens of thousands of poses. They require subscriptions to access them, and some are expensive, but if they provide inspiration that leads to bookings, they are worth it.
One can of course modify any pose to suit the needs of a session. The familiar Thinker pose by Rodin, or the Flandrin pose, does not need to be replicated exactly. Variety is the spice of life ... and art.
This should not need saying, but is included for the benefit of the newcomers and the curious. In photo shoots, the models seldom hold the poses for more than a minute. Ergo the poses can be dynamic and inspiring. However, many of them are not useable for life modeling sessions other than for gestures or under-3-minutes. If the model is greatly impressed by a certain pose, experiment with it. There are probably alterations that can significantly reduce muscle stress and tension, and thus make it suitable for longer poses.
• Be able to hold still for as long as 30 minutes, "still" meaning don't break or change the pose. Such things as sneezes, a quick movement to squelch an annoying itch (announce it beforehand — it will be appreciated by the artists), involuntary muscular activity, etcetera are understood as long as the exact pose is resumed as quickly as possible. Do understand that after a time in one position, the human body tends to settle in, and this changes the pose without the model being aware of it. Even the pros experience it. Best bet: understand that it will happen and be ready for it.
• Test every pose for the expected time before using it, to ascertain that it is doable and doesn't cause you to fall on your keester if your numbed leg refuses to cooperate when you stand. Save the exotic, strenuous or unnatural poses for the gestures.
A suggestion: add a safety factor, e.g., 25%, to the expected pose length to account for possible time-lengthening factors or other unpredictable conditions, and practice for that time. For example, if a pose is for 20 minutes, practice it for 25 minutes. If it can be held for that extra 5 minutes, 20 should not be a problem.
It would be worthwhile to contact the session leader or instructor to determine the usual time between breaks. A typical session will involve long poses of 20 minutes or so. However, if the long poses are 30 minutes without a break, adjust the poses to make them more comfortable for that duration.
• If a pose requested by the class or group proves to be unmaintainable indefinitely, request a break to recuperate and maybe discuss with the instructor a slight modification that can mean the difference between torment and mere discomfort. And if the instructor decides that he wants one of your gestures for an hour-long pose, discuss variations that would make it possible. It's your body. An hour kneeling with arms outstretched might make good art, but ...
• Have a retinue of poses on tap, and be creative. In classrooms, the instructor might ask for specific poses depending on what is being taught that day. In open studio sessions, the model is usually in charge of the poses. In either case, contacting the instructor or group leader ahead of time to ask what they will prefer or expect would be a professional approach.
• You may hear the term "natural pose". There is no precise definition, but if your pose is a position that you might see anywhere that people get together, and you are fairly comfortable maintaining it, it's natural. Natural poses are pretty much a must for long poses, i.e., 10 minutes or more.
If standing, don't hold a rigid military "at attention" pose. Aside from being bland and uninteresting to draw, it's not a natural stance, and it will stress the muscles after a few minutes. Be "at ease". When people stand, they tend to lean to one side, curving their bodies and putting more weight on one leg.
SIDEBAR ON
In art, such poses are called "contrapposto" (an Italian term meaning "counterpoise"). A pose is contrapposto when the model stands with one leg holding his full weight and the other leg relaxed. His hips and shoulders rest at opposite angles. and it gives a slight S-curve to the torso.
A perfect example of contrapposto is Michelangelo's David. Draw lines on a photo of the statue, one across the shoulders, one across the hips, and one following the center line of the torso. The opposing angles of the two lateral lines and the pronounced curve of the medial line will be evident.
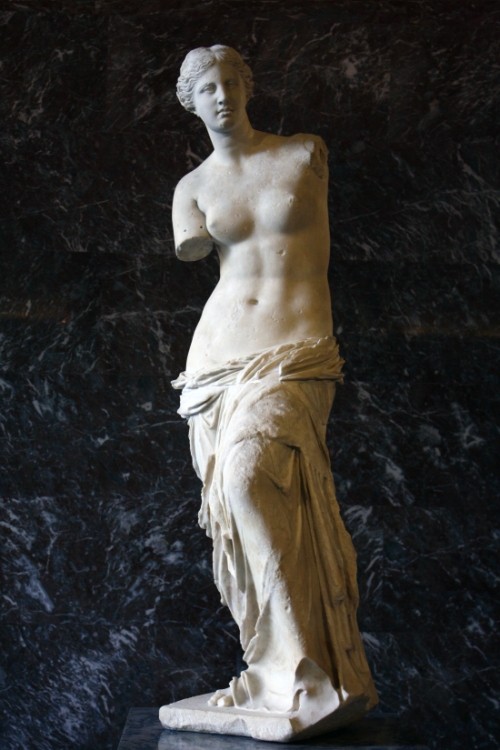
Another classic example is the ancient Greek sculpture, Aphrodite of Milos, aka Venus de Milo.
Although the term is Italian, the concept originated with the Greeks. They began with statues collectively known as "Kouros", meaning a youth or boy of noble rank, often depicting Apollo). The sculptures faced forward, with shoulders and hips level, and usually with one foot slightly in front of the other. This is a typical Kouros work.
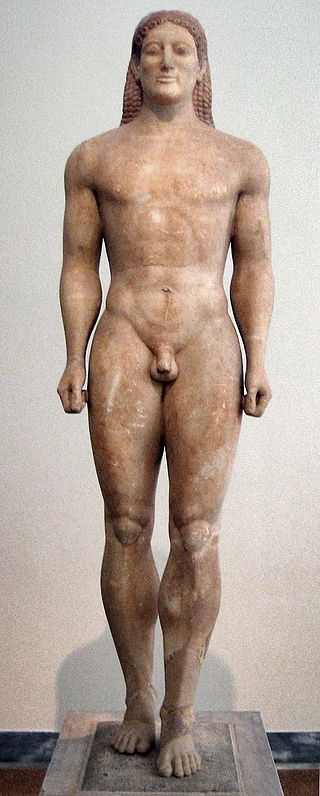
It has the accursed, stiff, artificial look. Eventually the Greeks, ever in pursuit of perfection in their art, decided to depict people as they really are. The Romans followed suit, and the realistic figures continued, revived by the Renaissance and still the standard today.
In life modeling, the contrapposto pose, being asymmetrical, gives the artists welcome variety and challenges.
SIDEBAR OFF
• A few bits of medical advice for extended standing poses:
• • Avoid locking the knees. If done for fairly short poses, it's not a big deal. However, for longer poses, it can cause pain and numbness, and in the case of hyperextension, joint damage. Adjust standing poses to prevent knee-lock. In fact, don't allow any joints to lock during poses. Your body will thank you.
• • Wiggle your toes occasionally to help with blood circulation in the feet. It's not a cure-all, but every bit helps.
• • For long standing poses, a recommendation is to use a pole or other prop for added support. Standing is a constant interaction between opposing muscular forces. With only one's feet on the floor, it could become challenging if not difficult to maintain a motionless pose for 20 minutes or more. By its very nature, the most stable support is a tripod. When standing still for a long pose, a third "leg" reduces the tiring muscular interaction required for maintaining a vertical position. Making the pole or support a part of the pose rather than a "crutch" also gives the artists something else to draw.
• If seated, be relaxed, not bolt upright. No matter how you choose to sit, do it in a way that you might expect to see where people are seated informally, and that you can hold without undue effort.
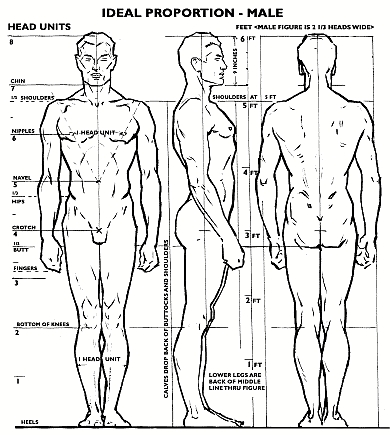
• Rule of thumb: if you look like you're posing for an anatomy diagram, it's not natural.
• For older guys, remember that what might be fairly easy for a hard-bodied 20-something is beyond the physical capacity of the mature folks. As "Dirty Harry" Callahan said, "A man's got to know his limitations."
• Resist the temptation to duplicate an awesome pose seen in a book, on the Web, or in a life session.
"A pose that looks graceful on one body, with individual proportions, might look clumsy or awkward on another."
-- Sarah R. Phillips, Modeling Life
Every model's body is unique. If you like a particular pose, see how it looks in the mirror, and optimize it to harmonize with your physique.
• A common recommendation for the gestures is to treat them as a dance or a performance. They can be based on a theme such as sports. Using a pole or other props can add visual impact and aid in creating a scenario. Arrange the pose sequence so that smooth transitions can be made between them. Wasting time going from one gesture pose to a totally different pose interupts the smooth flow and defeats the purpose of gestures.
• Timing of gestures or short poses (3 minutes or less) can be done by the old "one-thousand-one, one-thousand-two" count method, and will give you something to do while waiting for the next pose change. However, bring a digital countdown timer with an audible alert for longer poses. Don't rely on the instructor or group leader to tell you when it's time for a break. The time can stretch to quite a bit longer than expected, especially if you're holding a spectacular pose that has everyone fixated on committing it to their media.
• One can tell from the artists' reactions to poses what clicks with them and maintains their interest. If they spend every second of a pose drawing it, that's a good sign. If they count flies on the window, chalk it up to experience, add the pose to the "Avoid At All Costs" file and plan for something completely different when the timer beeps.
• Old saying: be ready and you won't have to get ready. A productive use of time in poses of five minutes or more is deciding on the fly what the next pose will be, rather than following a rote routine, and planning a smooth transition to the next pose. Sitting obliviously or watching the timer, and then deciding at the end of a pose what to do next is bound to create pressure and indecision.
• For long poses, you will have twenty or more minutes holding a position, with nothing else to do once your next pose is selected — if there is another pose. One suggestion from a life model is to have an iPod or other MP3 player to listen to during the long stretches of inactivity. If it can be made inconspicuous, the artists can easily avoid drawing it if they wish. An alternative is a Bluetooth-equipped player so that only the headset is on the body. You can then listen to your favorites and the time flies by.
Caution: avoid irresistible dance music.
• Looking over drawings and portraits from LD sessions, one sees that the facial expressions of the models are generally neutral, neither smiling nor frowning. It's not a matter of what the model is feeling at the time, but rather that active expressions require the use of facial muscles and the model's constant attention to maintain them. Over a long pose, those muscles will tire. Just let them relax and assume whatever casual "look" your face has when you're not thinking about it. The artists generally don't care.
• Hands and feet are among the greatest challenges for artists, even accomplished ones. With feet, there are very few options other than to position them in ways that don't require conscious effort and muscle activity to maintain them in place. Try to keep them fairly clean by avoiding walking barefoot on the classroom or studio floor, which can be cruddy with graphite and charcoal dust, etc. Few poses call for the soles of the feet to be dirty.
Hands are capable of a vast variety of positions and configurations. They can be almost as expressive as faces in conveying or enhancing moods. Don't just let them lie there inertly. Experiment with finger placement, spacing and bends, wrist alignment and other factors that give character and depth to the pose. Make them integral parts of the pose and challenge the artists. Of course the unwritten rule about avoiding constant effort and muscle tension to maintain the positions applies to the hands as much as to any other parts of the body.
I've given the reclining pose a separate section because of its size.
• The reclining pose has the in-some-cases-merited reputation as the lazy models' pose, the opportunity for a 20-minute nap. Lying flat on the back, with arms and legs in boring positions like a sunbather on a beach, is particularly unloved. If a reclining pose is on the agenda, practice twists and arm/leg positions that offer the artist something different.
This page has a number of reclining poses that are the very antithesis of the sunbather pose. One male model simply laid back with a flashlight aimed upward and a wide-eyed expression, evoking an image of a tense camper lying awake at night. Simple and creative. Props can add a lot to an otherwise so-so reclining pose.
• It might be tempting to practice reclining poses while lying on the bed. Don't do it! The bed won't be there in the studio or classroom. Most likely it will be a hard platform with perhaps some carpeting or padding, and occasionally just the floor — for example, the photo at the top of page 2. Poses that were easily done on the bed could become unmaintainable during the session.
Practice the poses on the floor, and adjust them to be as comfortable as possible on a surface that was not designed for comfort. If the venue provides a fairly soft surface, consider it a plus, but be ready in the more likely event that it doesn't.
• One factor to consider in all poses, but especially in reclining poses, is the "negative space", defined as any part of the setting that is not the subject. When reclining, the negative space is the upper portion of the drawing, sharply divided from the subject and generally uninteresting.
OTOH, a bent knee that creates an opening under the leg to provide a bounded negative space will be far more artistic. For one thing, it allows the artists to draw the contours of the leg that would otherwise be defined by the line separating the pressed-together legs, or hidden by the leg nearer the artist. For another, it breaks up the otherwise bland contour that separates the subject from the negative space above the model.
Experiment with poses where one or both legs are bent and at least one provides a negative space. Try a twisted torso so that the top arm can also provide a negative space. Another possibility is lying on the back with one leg bent and the hands clasped on the knee. This provides a variety of negative spaces, depending on the perspective seen by the artist.
Triangles are a staple in figure art, e.g., an arm where the hand is on the side of the body at waist level, thus creating a triangular negative space. Artists love them.
• A life model's best friend can be his pain reliever. Muscle aches are an occupational hazard. Not moving for two or three hours can be as strenuous as a workout. If the muscles are in constant tension while maintaining a pose — and just holding still fits that description to an extent — they will protest, if not on the dais, then on the way home or in bed. It often becomes a tradeoff between a fairly comfortable pose and an "interesting" one that puts the muscles and joints under stress. Be ready to be sore. However, if the session was productive and rewarding, it will be a good kind of pain.


© 2013 RP Renaud -- all rights reserved